
CDN
-
Posts
31 -
Joined
-
Last visited
Content Type
Profiles
Forums
Hunting New York - NY Hunting, Deer, Bow Hunting, Fishing, Trapping, Predator News and Forums
Media Demo
Links
Calendar
Store
Everything posted by CDN
-
I have been really lame about coming on here and contributing lately, and for that I apologize. Work has been busy, I'm knee deep into writing my cookbook, the kids are out school....hey, sounds like life, huh?! We made this dish for Father's Day breakfast and it turned out to be a homerun! Feel free to get creative with the stuffing ingredients. What you'll need: 2 Large bell peppers, cored and seeded (or one large bell pepper per adult) Southwestern style hashbrown potatoes (for this recipe I used Simply Potatoes Frozen Hasbrowns) Breakfast Sausage 4 eggs (or 2 per bell pepper) Shredded cheddar cheese Shredded mozarella cheese Sliced Vidalia onion or sweet onion Olive oil BBQ Rub (I used Old WoodFire Grill KK's 10 BBQ Rub) Start out by building a medium heat fire in your grill or smoker, around 350 degrees. I used the Weber Kettle for this cook, so for me that meant 1 large chimney full of lump charcoal, about half lit when dumped into the grill. Bank the charcoal on one one side to create a hot and cool zone. Back in the kitchen, cut the top out of the bell peppers and remove the core and seeds. In a pan, brown the hasbrowns in olive oil. When they are about halfway done, start another pan on medium heat with the crumbled breakfast sausage and sliced onion. When the sausage has browned and the onions have softened, strain the mixture and add to the hashbrowns. Continue to stir on medium heat until the hashbrowns are cooked. You can figure on about 1/4-1/2 cup of hashbrowns, onions and sausage mixture per bell pepper. When the mixture is ready, spoon some into each bell pepper. Add a layer of shredded cheese, then beat the eggs in a large mixing bowl and pour the beaten eggs into each pepper. The egg will seep into every nook and cranny in the hasbrown mixture. Season with the BBQ rub. Place the peppers on the grill on the "cool" side of the grate, opposite the coals. Let them cook on medium heat, around 350°, for about 25 minutes, or until the egg becomes solid and fluffy and starts to rise out of the top of the pepper. Using an oven mitt and a spatula, spin the peppers periodically to minimize blistering of the skin and to help the egg cook evenly. When the egg starts to rise out of the pepper, top them off with a little more of the shredded cheeses and another shake of BBQ rub.
-
I recently had a taste for a little wood flavored venison, so I could sit back here in the spring and reminisce about my success from last November (hate to brag but here's a little picture, just in case you haven't seen my buck!) Okay, enough showing off! Sorry, now back to the recipe. Anyway, I wanted to do something unique, so I decided to get some woodsy flavored mushrooms, a little greenery to add to the scenery, a dash of color and some bacon, cheese and onion thrown in. And WOW! Ladies and gentlemen, we have a winner! What you'll need: Venison backstrap, cleaned and all fat removed Fresh spinach leaves Sliced portobello mushrooms Sliced Monterrey Jack cheese Sliced Vidalia onion, or sweet onion Sliced bell pepper Chopped cilantro Bacon Olive oil BBQ Rub, such as Old WoodFire Grill KK's 10 BBQ Rub Toothpicks Hickory, pecan, apple, oak, or mesquite wood or chunks Start out by getting the fire going in your grill or cooker. You can go two ways with this stuffed backstrap, and both ways are great. You can either go for a low and slow smoked backstrap, or you can crank the heat up just a touch and cook it on a medium fire, which is faster. Personally, I prefer to go with a medium fire, about 300 degrees, it cooks a little faster and still gets a nice smoke flavor. I did this cook on the Weber Kettle, so that meant a full chimney of lump charcoal, about half lit when dumped into the grill, banked on one side. Toss a chunk or two of wood (I used pecan) onto the coals to get a little smoke going. Use a sharp knife (a fillet knife works well) to butterfly the backstrap, cutting right through the middle but not all the way through. Next, layer your ingredients on the inside, starting with the sliced cheese. You notice in the ingredients section of this recipe, I didn't list the particular amount of each ingredient to use, because the variation in size of backstraps could be great. A moose backstrap is gonna hold a lot more than a Coues deer backstrap! But in this case I was using a whitetail deer backstrap, so I stuffed it with as much of the ingredients as I could and still be able to fold it over. Folding can be a little tricky, and having an extra hand around can be a big help. But a little trick that I figured out is to fold it over, and starting at one end, start toothpicking the top and bottom sides together along the edge, stuffing the ingredients in and pinching the sides together as you work from one end to the other. Then when you get ready to wrap in bacon, the bacon can conveniently be hooked onto the toothpicks. Once you have it all stuffed and toothpicked, give the backstrap a light coat of olive oil and season with the BBQ rub. then wrap a few pieces of bacon around the stuffed backstrap, hooking the ends on the toothpicks as mentioned. It doesn't need to be completely covered in bacon, just enough pieces to cover it for the most part. Put a light coat of olive oil on the cooking grate and place the stuffed backstrap on the grate on the opposite side from the coals. If you're using a Weber Kettle as I did, close the lid and position the vent so that it is directly over the meat, to draw the smoke over the backstrap. Whether you are slow smoking or grill cooking, cook to an internal temp of around 135 degrees for medium doneness, which is my preference. You can adjust the internal temperature to your tastes and the level of doneness that you prefer, but remember, you can always cook it more, but you can never take it backwards! When done, slice it and serve it hot!
-
I took the girls to the hunting land recently to hopefully catch a stringer full of crappie for a big fish fry. So we loaded up the rods and reels, a cooler of snacks and a bucket full of minnows and headed out! But after about 2 solid hours of floating live minnows under a bobber with no luck, I decided to try my luck at bass. So I picked up a baitcaster with a jerk bait and started making casts. About the 4th cast into it, bam! But not a bass, but a big ole' slab side crappie! So I'm thinking, "ok, they'll hit an artificial lure, but not live bait?! What gives!!" I also figured that I had found them, so I relocated the girls over to that spot with the minnows. 1 hour and no fish later, I decided to try the bass again. This time I ws chunking a rattletrap. 1st cast, BAM!! Another big ole' slab!! So at the end of the day, we only had 2 big slabs, but had had a good time and headed for home with new plans for our catch, seeing as how 2 does not make a fish fry! What you'll need: Crappie filets, or can substitute almost any fish filets that you like Melted butter Cajun seasoning 1 cup of black beans, cooked 1/4 cup chopped bell pepper 1/4 cup chopped tomatoes 1/4 cup grilled corn, kernals cut off the cob Balsamic vinegar Fresh cracked black pepper Start out by building a medium fire in your cooker. For this cook I used the Weber Kettle, so for me that means 3/4 chimney of lump charcoal, fully lit when dumped into the grill, banked on one side. Start with clean crappie filets, skin removed, dipped in melted butter. Remove the filets from the butter and season with cajun seasoning. Carefully put a light coat of olive oil or other cooking oil on the grate and place the filets on the grate right over the hot coals. Let the filets cook for about 3-5 minutes, depending on the thickness of your fish, obviously the thicker they are the longer you want to let them go. Flip the filets, and let them cook for another 3-5 minutes, or until the flesh is opaque and flakes easily. Combine the black beans, grilled corn, tomatoes and bell peppers in a bowl. Crumble the blackened crappie filets and add to the bowl. Mix the salad thoroughly. Pour a little balsamic vinegar over the salad for a dressing, and top it off with fresh cracked black pepper.
-
For all the recipes that I do that are maybe not so good for you, here is one that is a little more friendly to the waistline and the arteries! These turkey burgers are a great alternative to the classic red meat burger, they're a breeze to make, and they taste incredible! What you'll need: 1/2 to 1 pound ground turkey - 1/2 pound will make approximately 4 burgers BBQ seasoning, such as Old WoodFire Grill KK's 10 BBQ Rub, or Cajun seasoning 1 raw egg Oatmeal Diced pickled jalapenos (optional) Wood chunks, such as hickory, pecan or apple Put the ground turkey in a large bowl and add the raw egg, mixing thoroughly. Add a little oatmeal and mix it in, continuing to add oatmeal as needed to get a sticky consistency. This will help make the burger patties stick together. If you want to spice them up a bit, add a tablespoon or so of diced pickled jalapenos. Season the patties with the BBQ rub or Cajun seasoning and place them in the refrigerator for an hour or so prior to cooking. This will also help them "set up" and not fall apart. Start your grill by building a medium to hot fire, around 350 degrees. I did this cook on the Weber Kettle, so for me that meant a full chimney of lump charcoal, fully lit when dumped and banked on one side, to create a hot side and a "cool" side. Throw a couple chunks of wood on the coals, such as hickory, pecan or apple, to get a nice smoky flavor on the turkey burgers. Carefully coat the grate with a light coat of olive oil or other cooking oil, and place the turkey burgers on the cool side of the grate. I normally would put red meat type burgers right over the coals to sear them and bring them off fairly quick, as I like them medium rare, but you will want to make sure the turkey gets thoroughly cooked. Trying to sear them could end up getting them too done and cause them to be dry. Let the turkey burgers cook for about 10 minutes on each side, or until the middle of the burger is white and no pink can be found internally. Serve them up on wheat buns with Creole mustard and a slice of tomato and lettuce.
-
I recently wanted cook cook something really unique to put on my website, and so after a lot of debate, I consulted my Louisiana Cajun cooking connection, and she suggested Cajun style stuffed pork chops. And she has never been wrong before, so I was all ears to hear her methods and suggestions. The only thing I did different from her original recipe was to smoke cook the pork chops on the Weber Kettle, as opposed to pan frying or oven cooking. I'm here to tell you, as the Cajuns would say, it was "ca c'est beaucoups bien!" What you'll need: Thick cut pork chops, about 1 1/4" to 1 1/2" thick (I used boneless pork chops for this cook, but pork chops with bones would do fine) 1/4 cup finely chopped onion 1/4 cup finely chopped bell pepper 1/4 cup finely chopped celery About 1/2 of a link of Andouille sausage Crusty bread, cubed Chicken broth, approximately 1/2 cup 1/4 cup crab meat, chopped finely (I cheated with imitation crab for this cook) Cajun Seasoning Olive oil Pecan or hickory wood or chunks Start out by building a medium fire in your cooker, around 300 degrees. For this cook I used the Weber Kettle, so for me, that means a full chimney of lump charcoal, about half lit when dumped into the grill. Bank the charcoal on one side, creating a hot side and a cool side. Toss a couple of chunks of wood on the coals to get a little smoke going while the coals are burning to cooking temp. Remove the casings from the Andouille sausage and brown in a skillet with a little olive oil until it crumbles easily. Once the sausage has browned, strain it and reserve some of the drippings. In the same pan, add the chopped celery, onions and bell pepper and lightly saute. Once they have softened a little, add the browned sausage back to the pan, season with Cajun seasoning and stir to mix thoroughly. Pour the mixture into a bowl and add the cubed bread. Stir in chicken broth a little at a time, until you reach a nice sticky consistency. Add the chopped crab and stir to mix. Cut a slit in each pork chop to create a "pocket". Spoon the mixture into the pocket. Once the pork chops have been stuffed, put a light coat of olive oil on the outside and season with Cajun seasoning. Put the stuffed pork chops on the grate on the opposite side from the coals. Close the lid, situating so that the vent is directly over the pork chops, so as to draw the smoke over them. Cook them for about 45 minutes at 300 degrees, flipping half way through, or until a toothpick inserted into one yields juice that runs clear. When done, plate them up and serve hot! Bon appetite!
-
 As I have made mention before on this website, I have a huge craving for Cajun cooking and a tremendous desire to learn more about the deep roots of the food and the culture known as Acadian. I can and do read about it from time to time, watch "Swamp People" of course, but being from Georgia, it can be hard to get the real scoop. So luckily for me, I have a good friend that is 100% pure Cajun, transplanted here to Georgia several years ago. She is a walking Cajun cookbook, and every chance I get, I try to pry a good Cajun recipe out of her and try to put a BBQ twist on it. This is her latest recipe that she gave me, and I'm here to tell you, it will not disappoint! What you'll need: Fresh eggplants, halved (one half will easily feed a hungry adult) Pulled smoked chicken, about 1/2 cup per meduim sized eggplant (My method for smoked chicken can be found Here) Smoked sausage, chopped or chunked, about 1/4 cup per medium sized eggplant 1 cup onions, finely chopped 1/2 cup bell pepper, finely chopped 1/2 cup celery, finely chopped 2 cloves garlic, finely chopped 3 tablespoons butter 1 cup bread crumbs (for this recipe we used panko) 1 cup whole grain rice, cooked Cajun Seasoning Lemon juice Water Spray cooking oil, such as olive oil or canola Chopped scallions Hickory or pecan wood or chunks Start out by buiding a medium heat fire in the grill or smoker, around 350 degrees. For this cook I used the Weber Kettle, and used a full chimney of lump charcoal, half lit when dumped in, banked on wood side. Toss a chunk of wood on the coals to get a nice smoke going. I used hickory for this cook, but pecan would be a good choice as well. Prep the eggplant by washing it and cutting it in half, lengthwise. Using a small spoon or an ice cream scoop, remove the inner portion of the eggplant, leaving about 1/4 inch all the way around, so that you are left with a carved out shell, similar to how you would if you were making twice baked potatoes. Place the eggplant shells in a large pan or bowl and cover with cold water, adding a teaspoon of lemon juice to the water. This will keep them from starting to turn brown. Let them sit in the water and lemon juice for about 15 minutes. Place the carved out eggplant in a large pan and cover with water and a teaspoon of lemon juice. Cook on medium heat, stirring occasionally for about 10 minutes or until the eggplant has softened. Remove from the heat and strain the eggplant to remove the water. In the same pan, lightly saute the bell pepper, onion and celery with the butter, just until they start to soften. Add the eggplant carving, the pulled chicken, the sausage, the garlic, about 3/4 cup of the bread crumbs and the rice to the pan. Season to taste with the Cajun seasoning. Stir to mix it up well. Spray a large aluminum pan or other baking type dish with cooking oil and place the eggplant shells in the pan. Fill the shells with the mixture and top with the remaining bread crumbs. Place the pan with the stuffed eggplant shells on the grill on the "cool" side of the grate, opposite the coals. Close the lid and let them cook for about 15 minutes, or until the stuffing starts to get a nice crust. Garnish with the chopped scallions and serve hot with a nice crusty garlic bread.
 -
Hey man, don't feel bad, it's about the same here, and I'm in the deep south!!
-
Sure you could use the whole egg. I just do that to cut back a little cholesterol, but it wouldn't make that much difference, and would probably make them stick even better.
-
Venison burgers are a favorite around my house, especially in the summer on Sunday afternoons around the pool. We like to use pure venison, no added fat. This recipe is the same as I would use for big full size deer burgers, but for this cook we cut them down to slider burger size. What you'll need: Ground vension ( a 1 pound package will make about 6 sliders) Egg whites, about 3 per 1 pound of ground venison Plain oatmeal Old WoodFire Grill's KK's 10 BBQ Rub Montreal steak seasoning Olive Oil or grill spray Hickory, pecan or mesquite wood or chunks In a large bowl, combine the ground venison and the egg whites and fold until thoroughly mixed. Add oatmeal, a little at a time, and continue to fold until the mixture has a sticky consistency. This will make them hold together well without using added fat. Pat the meat out into small burgers and place on a cookie sheet. Season with Old WoodFire Grill's KK's 10 BBQ Rub and Montreal steak seasoning. Place in the refrigerator for about an hour prior to cooking. This will also help to soildify the burgers and prevent them from coming apart. Start your grill by buiding a medium to hot fire, around 350-400 degrees. For this cook I used the Weber Kettle, and I used a large chimney full of lump charcoal, fully lit. Bank the charcoal on one side, to create a hot side and a cool side. Throw a chunk of wood on the coals to give it a little smoke flavor. I really like mesquite for my burgers, but in my opinion hickory and pecan are good choices also. When the coals are burning good and the flames have died down, carefully coat the cooking grate with olive oil and place the burgers on the grate, directly over the coals. Let them cook for about 2-3 minutes, then flip and repeat. Once they have finished on the hot side, move them to the cool side and place a half slice of cheese on each one, close the lid and let it melt. Once the cheese has melted, remove the slider burgers from the grill and place a few buns on the cool side to toast. Serve them up with Old WoodFire Grill's Beer Battered Fries.
-
One more last minute idea for Super Bowl Parties!! These need no introduction...just need to be eaten!!! What you'll need: Baking size potatoes Olive Oil Fresh cracked black pepper Shredded cheddar cheese Shredded mozzarella cheese Bacon, crumbled Chopped scallions Chopped chives Sour cream Old WoodFire Grill KK's 10 BBQ Rub or Big Green Egg Seasoning Aluminum foil Start by baking the potatoes, getting the grill or smoker going with a cooking fire at around 350 to 400 degrees. Or, if you are already smoking something, such as ribs as I was in this particular cook, you can go with a 250 degree fire, it will just take longer to get the potatoes baked. Wash the potatoes, stab them a couple of times with a knife or fork, coat in olive oil and cover with a light coating of fresh cracked black pepper. Wrap the potato up in aluminum foil and place on the grill. You want cook them indirect, not over the coals or flame. If you are cooking at 350-400 degrees they will take about 1 hour. At 250, it will take about 1 3/4 - 2 hours to get them done. Once the potatoes have finished baking, bring them in and slice them in half. Using a spoon, or even better, a kitchen utensil such as an ice cream scoop, carefully scoop out the middle, leaving about a 1/8 inch remaining around the edges and the bottom. Save the middle portion to be used as mashed potatoes or a variety of other applications that call for baked or mashed potatoes. Fill the center with the shredded cheeses, and sprinkle with the bbq rub. I used Big Green Egg seasoning for this cook, as it is a little more salty tasting than my rub, which I like on potatoes. But use what you like. The idea is to get a little flavor on the tater skins. Place the loaded potatoes in an aluminum pan or on a cookie sheet and put them back on the grill or smoker. Let them cook until the cheese has melted and the crust around the edges is starting to brown up and get firm. The amount of time that this takes will depend on the temperature that you are running, so just keep an eye on them. When they are done on the grill or smoker, bring them in and top off with one more sprinkle of bbq rub, the crumbled bacon, chopped scallions and chopped chives. Serve with fresh sour cream and enjoy!
-
Great!! I am glad you guys enjoyed them
-
On a hunting trip to Saskatchewan a few years ago, we stopped at a convenience store for gas and some snacks, and they had some riblets that were fried. They were really good, and my buddy Walt Rabern and I deducted we could put a southern twist on it by smoking them and then frying them! Turns out, we were not wrong! These things turned out so good, it is MUST for my Superbowl Party menu! What you'll need: For the batter 1 cup flour 1 cup corn starch 12 ounce can of beer 1 tablespoon Old WoodFire Grill KK's 10 BBQ Rub© 1 tablespoon granulated garlic For the ribs Boneless country style ribs Old WoodFire Grill KK's 10 BBQ Rub© Hickory or pecan wood or chunks Start out by seasoning the boneless country style ribs with a liberal coating of Old WoodFire Grill KK's 10 BBQ Rub. After seasoning, place them back in the refrigerator for a couple of hours prior to cooking, up to overnight. For the smoking of the ribs, you want to put them on your cooker long enough to get a nice smoky flavor, but not cooked all the way through. You can do them on your choice of cookers, such as the Weber Kettle, Big Green Egg, or any other type smoker you may have. You could also use a gas grill using an indirect method with some wood chips or chunks. The idea is to maintain a low smoking temp of around 225 degrees. I used my offset smoker for this cook, burning hickory, but pecan would do nicely as well. Smoke the ribs for about 45 minutes to an hour, or until the outside starts to take on some color, to get a nice smokering. In the meantime, mix up the batter for the ribs by mixing the flour and corn starch in a large bowl. Pour in the beer, stirring with a whisk until you get a nice consistency, about like pancake batter. Only use enough beer to get the consistency that you want. Add 1 tablespoon of Old WoodFire Grill KK's 10 BBQ Rub and 1 tablespoon of granulated garlic. When the ribs are ready to come in, cut them into chunks and place them in the batter, mixing well so as to completely coat each chunk. Once battered, deep fry the riblets at 350 degrees until the coating is crisp and the riblets are floating. Smother them with your favorite BBQ sauce and serve with Old WoodFire Grill's Beer Battered Fries http://www.oldwoodfiregrill.com/?p=1143
-
With SuperBowl Sunday right around the corner, we are kicking up some great football party foods here at www.OldWoodFireGrill.com to get ready for the big game. Smoky Hot Tater Tots is an idea that we came up with based on simple principles: bacon is good, jalapenos are good and tater tots are good! But putting them all together - on a smoker - that's gotta be a match made in heaven! I'm here to tell you, they didn't disappoint! Here's what you'll need: Fresh large size jalapenos, seeds and membranes removed Thick sliced bacon Frozen tater tots, Old WoodFire Grill's KK's 10 BBQ Rub© Toothpicks Start out by removing the seeds and membranes of the jalapeno peppers. It is a good idea to wear latex gloves while doing this, as the juices from the peppers can get on your fingers and be spread to your eyes, nose and other places where it may not be enjoyable. Cut the top out of the jalapeno, then use a kitchen utensil such as a vegetable peeler or small spoon to core out the inside of the pepper, discarding the seeds and membrane. Slice the peppers into pieces just slightly smaller than a tater tot. Rinse them with cold water and pat them dry. Insert a frozen tater tot into each jalapeno slice, and wrap with bacon. You can slice the ends in half and place the tater tot between them. The key to the bacon wrap is to go around the pepper/tater tot horizontally and vertically. Secure the bacon with a toothpick. Dust the tater tots with a coat of Old WoodFire Grill's KK's 10 BBQ Rub© and you are set for the smoker. Place them on your cooker and smoke at 250-300 degrees for about 45 minutes, or until the bacon crisps up. Serve them hot with a variety of other finger foods and enjoy!
-
My Granny Louise makes the best chicken and dumplings to be had in the USA. Hands down, no contest, don't even start. And I'm not trying to compete with her. But I've never known her to make VENISON and dumplings. So, maybe I can start a new traditon here with a little recipe I dreamed up and have my grand kids some day (long way off, I have kids in elementary school!) start off a post on their website, "My Pops makes the best venison and dumpling stew to be had..." , you get the idea. Here's what you'll need: For the stew- Chunks of stew quality venison Old WoodFire Grill's KK's 10 BBQ Rub 4 cups of water 1 cup of beef broth or chicken broth 1 tablespoon Cajun seasoning 1 teaspoon black pepper Hot sauce, to taste 1/2 cup sliced carrots 1/2 cup chopped celery 1/2 cup sliced onions Chopped green onions for garnish For the dumplings- 1 1/2 cups all-purpose flour 2 teaspoon baking powder 3/4 teaspoon salt 3 tablespoon butter 3/4 cup milk Start out by seasoning the venison chunks with Old WoodFire Grill's KK's 10 BBQ Rub and lightly smoking them. For this cook I used the Weber Kettle and started with a half chimney of lump charcoal, banked on one side, along with a chunk of hickory. Place the chunks of venison on the "cool" side of the grate and close the lid, positioning the vent so that it is over the meat in order to draw the smoke across the meat. Cook them at around 200-220 degrees for about 30 minutes, just to get a nice smoky flavor. You could also lightly brown the seasoned venison in a pan with olive oil if you don't want to fire up the BBQ pit, but you would miss out on the smoky flavor. Cut the smoked chunks into bite size cubes. In a crockpot, combine the water, beef or chicken broth, Cajun seasoning, black pepper, hot sauce and smoked venison chunks. Cover and cook on high for around 5 hours, or until the venison is fall apart tender. Next, add the sliced carrots, onions and chopped celery and let it cook for another 2 to 3 hours, or until the vegetables have started to soften up. To make the dumplings, combine the flour, baking powder and salt in a bowl. Using a pastry blender or fork, cut in small "crumbles" of butter to the dry mixture. Add the milk and stir until well blended. Using a large spoon, drop heaping lumps onto the top of the stew and let simmer for 10 minutes with the lid off, then cover and let simmer for additional 10 minutes. Serve it up piping hot with chopped green onions for garnish.
-
Gotta die of something
-
Here is a recipe for some bacon wrapped venison steaks that I'll put up against a beef steak anyday. Don't get me wrong, I LOVE beef steaks, and they are the gold standard when it comes to fine dining off the hot wood coals. But some folks have the misconception that venison is too lean to grill and will be too dry and/or gamey tasting. I say nonsense, if you handle the meat correctly, trim it well and add a little pork fat to it, you can turn out steaks that would make Longhorn's want to change their name to Big Racks! Here's what you'll need: Venison steaks, cut from the backstrap or from the ham Olive Oil Old WoodFire Grill's KK's 10 BBQ Rub Montreal steak seasoning Bacon, uncooked Toothpicks Hickory, oak, pecan or mesquite wood Start by cutting your venison steaks. I like to process my own deer, and am by no means an expert butcher, but over the years I have learned alot of tips and techniques to get the most out my venison, both quantity and quality wise. In this particular case I cut these steaks from the top round portion of the deer's back leg. Prior to cutting the steaks, I had kept the deer ham and the rest of the meat in a cooler with bags of ice, still in the bag, packed around the meat, with the drain of the cooler open so that it could constantly drain, for 5 days to let the meat "bleed out" and age. Now this is not to be confused with dry aging which is an entirely different process. On the 5th day, I removed the meat from the cooler and trimmed all the fat from the hams and the rest of the meat. I then deboned the hams by seperating the major layers of the meat, which is easy to do once you start. There are alot of charts on the internet to show you how this can be done, just do a search. The next thing you want to do after you have seperated the layers of the ham is to remove the silver skin and membrane type matter from the surface of your cuts. This can be a tedious process, but makes a big difference in the final quality of the cut of meat that you are left with. Notice my steaks are lean, clean and beautiful. For this cook I used the Weber Kettle. You want to cook these steaks just as you would a beef steak, over a searing hot fire. So for me, that means starting out with about 1 3/4 chimney of lump charcoal. Dump about a chimney full in the grill, unlit, then light another 3/4 chimney full and dump it in once it gets burning good. Be sure to bank it on one side, not only to create a hot and cool zone, but to concentrate your heat in one area, as you are going to be cooking directly over the coals at around 500 degrees. Throw a couple of chunks of your favorite wood on the coals for a little flavor. My favorite for steaks is mesquite. Meanwhile, go ahead and get your steaks seasoned up and ready for the grill. I like to take my steaks out of the refrigerator at least an hour or so before I light the grill to let them warm up a little. Wrap the venison steaks with bacon, securing with a toothpick. Next, season them with Old WoodFire Grill's KK's 10 BBQ Rub and let them rest while the fire is getting going. Just before you are going to put them on the grill, drizzle the steaks with olive oil and lightly season with a little Montreal steak seasoning. When the fire has reached its searing point, close the lid and wait until the flames have died down and the coals are glowing bright, then lightly brush the cooking grate with olive oil, careful not to let the oil drip onto the coals and flame up. Place the steaks on the freshly oiled grate at a 45 degree angle, so as to get nice grill marks. Close the lid and let the steak sear for 1 minute, then turn 90 degrees on the same side and repeat. You will be catching the fire at its hottest point and will get the best grill marks that way, and this is the side that you want to place upward on the plate when you serve the steaks. I like to use a cast iron grate to obtain the best marks. I have an old cast iron grate that came out of an old gas grill that I modified to fit my Weber, but you can buy a small one from grill supply stores. Repeat the process by turning the steaks over and cooking the other side in the same fashion. On the final flip, you can let the steak continue to cook past the one minute mark to reach the level of doneness that you prefer. The thickness of your steak will dictate the cooking time as well. I like my steaks medium rare, and for steaks as thick as I cut these (about 1-1/2 inches thick), I cooked them for a total of 6 minutes. When the steaks are done, place them in a dish or tupperware type bowl and cover with a kitchen towel. Let them rest for about 10 minutes before serving. Serve them up with a baked potato and some sauteed mushrooms.
-
It has been a beautiful fall here in Georgia, the leaves have been amazingly vibrant and we have had some cold frosty mornings, mixed with a few warm days, and I have tried to take advantage of this wonderful time of the year to soak it all up. But something big has been missing this fall. For the first time since I was a young child, my family and I don't have a hunting lease. Family members passing on, financial strains and a number of other factors forced us to put it to the side this year. We are fortunate to have permission to hunt a small tract not far from home, but it's just not the same as going to "deer camp". But one thing I am blessed with, along with the greastest family in the world, is some very good friends that I value more than I could ever put into words. Two of my greatest friends invited me and my Dad to come hunt with them on their property, to share the season together, laugh, eat, solve world problems, and maybe even get a buck or too. After a little scouting, I chose a remote spot with great buck sign that had not been hunted in a while. The second morning in that stand, the buck in the above picture showed up! I have a feeling I won't be invited back! But to Walt, Joey and Mr. Leroy, if you are reading this, I am cooking up this Wood Fired Venison Tenderloin for you as we speak, I'm gonna serve it up with some eggs, hashbrowns and coffee, and I want to invite you to come enjoy this deer with me again as we did that magical day. Thank you again for your hospitality, but thank you most for our friendship. What you'll need: Venison tenderloin Olive oil Old WoodFire Grill KK's 10 BBQ Rub Montreal steak seasoning Oak, hickory, pecan or mesquite chunks Start out by building a searing hot fire in your grill, around 500 degrees. I did this cook on the Weber Kettle and used the same fire building method as I do for steaks, as outlined here http://www.oldwoodfiregrill.com/?p=502. Take the tenderloins out of the fridge a couple of hours before you intend to cook them and season them lightly with Old WoodFire Grill KK's 10 BBQ Rub. Just before you are going to put them on the grill, brush them with olive oil and give them a light coat of Montreal steak seasoning. When the fire is searing hot, place the tenderloins on the grate directly over the coals at a 45 degree angle to the direction of the grates (to get the great looking grill marks!). Close the lid and let them cook for 1 minute, then turn them 90 degrees, without flipping them over, and let them go another minute. Next, flip them over and repeat the process. After the final flip, let them cook for about 2 to 3 additional minutes for a medium rare doneness. If you like them more done, let them go a little longer, perhaps lightly cutting into one to check the level of doneness to get it to your liking. When they are ready, place them in a deep dish or tupperware type bowl and cover with a kitchen towel. Let them rest for about 10 minutes before serving, to allow the juices to redistribute. Serve them up in any number of ways: as a steak dinner with a baked potato (like this http://www.oldwoodfiregrill.com/?page_id=505), with country vegetables or one of my favorites, on a breakfast plate.
-
With Thanksgiving Day right around the corner, it's time to start thinking about putting the all important menu together for that special meal. There are all kinds of ways to cook up a turkey, and quite frankly, I'm not opposed to any of them. Smoked, deep fried, or even cooked in the oven, I've had some good ones over the years. But seeing as how this is an outdoor cooking site, I'll leave the indoor gas oven out of this one! This recipe is for a smoked turkey breast injected with homemade jalapeno butter and seasoned with herbs. Sound good? I'm here to tell you, it is! Here's how we do it. What you'll need: Turkey breast, or whole turkey, preferably 12 pounds or less Olive Oil Pecan, hickory, apple or cherry wood or chunks Ingredients for the injection: 6-8 fresh jalapeno peppers, seeds and membranes removed, chopped finely 1 tbs minced garlic 1/2 cup butter 3 oz. beer 1 tsp finely ground black pepper 1/2 tsp McCormick Poultry Seasoning (which consists of small amounts of crushed thyme, crushed sage, crushed marjoram, crushed rosemary, crushed nutmeg, and a tiny amount of finely ground black pepper) For the rub: 1 tbs paprika 1 tsp course ground black pepper 1 tsp celery salt 1 tsp McCormick Poultry Seasoning Start out by getting your fire up and running in your cooker. For this cook, I used my offset smoker and burned pecan wood for a light, nutty flavor. I would suggest a mild wood, such as pecan, apple or cherry. Hickory would do nicely as well, but is a little stronger than the others. I have done this exact recipe on the Weber Kettle as well, using the same set up as I would to smoke ribs, which can be found HERE . The idea is maintain a 300-325 degree fire for around 3-6 hours, depending on whether you are doing a turkey breast or a whole turkey, and also the size of the bird. You want to choose a turkey that is 12 pounds or less, otherwise it takes too long too cook on the smoker, and the outer portions will get overcooked and dry while trying to get the deep internal portions done. We did an 8 pound turkey breast for this cook and it took around 3 hours. While the fire is getting going, go ahead and make the injectable marinade. Combine the butter, chopped jalapenos and minced garlic in a skillet and melt the butter. Stir the mixture frequently and let it simmer for about 5-7 minutes after the butter has melted to extract the flavor from the peppers and garlic and "infuse" the butter. Next, strain the butter, jalapeno and garlic mixture through a colander and into a small container. Add about 3 ounces of beer and the black pepper and McCormick Poultry Seasoning to the liquid. Stir it together to thoroughly mix the ingredients. Next, inject the turkey with the marinade using a food syringe. They key is get the injection into as many spots on the turkey as possible. If the injection marinade starts to get a little thick, just reheat it in the microwave. Coat the outside of the turkey or turkey breast with a light coat of olive oil. Combine the ingredients for the herb rub and mix them together well. Season the outside of the turkey with the herb rub. When the fire in your smoker or other type cooker has come up to around 300 degrees, put the turkey or turkey breast on and cook it to 160 degrees internal in the breast, or 165 degrees in the middle of the thigh for a whole turkey. These temps will allow you to "rest" the turkey covered for about 20 minutes after you bring it in and it will come up to the perfect temps of 165 for the breast and 170 for the thigh. You want to use a good meat thermometer to check your temp, and do not let it go past the target temperatures, as it will dry out. Here is a starting out picture of a turkey breast on the Weber Kettle, followed by a finishing picture of a breast on an offset smoker. When the turkey has reached the target temperature, bring it in and cover the turkey loosely with a foil "tent". Let it rest for around 20 minutes. Slice the turkey or turkey breast and serve with your favorite sides! Note that if your turkey breast slices or other pieces have a slight pink color, do not be alarmed. That is normal for smoked turkey. Just make sure that the temperatures of the final product are what they should be (165 for the breast and 170 for the thigh). Please stay tuned to the website as I will have several recipe ideas for turkey leftovers coming up in the next few days and weeks leading up to Thanksgiving.
-
We love Italian food and decided to try and put a new twist on lasagna by using ground venison AND cooking it on my smoker. By building a big oak fire in the fire box, we created a wood fired oven that turned out the best lasagna I've ever had! Here's what you'll need: Olive oil 2/3 cup chopped onion 1 lb. sweet Italian sausage 1 lb. ground venison 3-4 cloves of minced garlic 2 14.5 oz cans of fire roasted diced tomatoes 2 cups tomato sauce 12 oz. of tomato paste 1 cup water 1 tsp fennel seed 2 tsp basil 2 tbs fresh parsley 1 tsp salt 1 tsp Italian seasoning 1 tsp black pepper lasagna noodles 24 oz. Ricotta cheese 1lb grated mozzarella cheese I turned my offset smoker into a wood fired oven for this cook by building a bigger fire than I normally would in the fire box. I used red oak and brought the temp up to 350-375 degrees, which is hotter than I would use to smoke a rack of ribs but perfect for this application. You could do this recipe with any kind of grill or smoker that you have. The goal is to be able to maintain a 350 degree fire for around an hour, so build your fire accordingly. Once the fire is burning and coming up to temp, prepare the lasagna by browning the Italian sausage and the ground venison in a pan with olive oil, the chopped onion and the minced garlic. Once the meats have browned, stir in the fire roasted tomatoes, tomato sauce and tomato paste. Once mixed well with the meats, onion and garlic, add the fennel seed, basil, parsley, salt, Italian seasoning and black pepper and stir to thoroughly mix the ingredients. Let the sauce simmer on low to medium low heat for 1 to 1 1/2 hours. Boil the lasagna noodles in water to al dente. Add a teaspoon of olive oil to the water to help prevent sticking together. When the noodles are ready, coat the bottom of a baking pan with a light coat of olive oil and spread a layer of the meat sauce in the bottom. Next, place a layer of noodles, ricotta cheese followed by mozzarella. Repeat the layering process, leaving the final lasagna noodles and mozzarella cheese for the top layer. Cover the pan with foil and place on the smoker. When the smoker temperature has leveled off at around 350 degrees, place the lasagna on the smoker and cook covered for 25 minutes. If you suspect you have a "hot spot" on one side or the other, rotate the pan around using oven mitts. At the 25 minute mark, remove the foil and cook uncovered for another 25 minutes, or until the top has browned slightly and the top layer of cheese is melted. Let the lasagna stand for 10 minutes or so before serving. The faint wood smoke gives it the extra flavor to make this a classic!
-
I had the good fortune this past week of spending the day on the Chattahoochee River with one of my best friends in the world, fishing from float tubes for rainbow and brown trout. He and I used to make this float trip just about every other weekend, but work, family and other factors have limited our time to do it in the past few years. So we decided that no matter what, we were gonna do it that day! The Good Lord gave us a beautiful day and we caught a few fish too! We made the float from Buford Dam to the Georgia Highway 20 Bridge, and amongst all the hustle and bustle of the North Georgia sprawling development and traffic is this pristine stretch of river, virtually untouched by anyone other than trout fishermen. The water is clear and cold, coming out of Buford Dam at about 50 something degrees, even on this day in June when the air temp was about 95! There are alot of deep pools, swift runs and even a couple of whitewater type rapids to navigate through. I was about to go through one those whitewater rapids and decided I better snap a picture of myself, so that my family could have comfort in knowing that I was still alive before I entered the rapids! We cast spinners, minnow crankbaits, flies and even a few bait eggs to hook up with around 20 fish for the day. Not a banner day, but fun none the less and a great opportunity to spend time with a great friend and put some food on the table! I decided to take a few of the trout and smoke them and make some tacos. Sound good? Well here's how I did it. What you'll need: Four medium size fresh trout Grill Mates Mojito Lime Marinade Mix Olive Oil 2 tablespoons Water 2 Tablespoons Apple Cider Vinegar Tortillas Chopped lettuce Shredded Cheese Salsa Sour Cream Fresh cilantro Hickory or apple chunks Start out by mixing the Mojito Lime mix with the olive oil, water and apple cider vinegar per the instructions on the package. You could subsititute this marinade with Mojo Criollo. Place the trout in a zip-loc bag and pour the marinade over them. Shake it around to completely cover them and place in the refrigerator for about an hour. Now it's time to get your grill or smoker going. You could smoke trout on any type of equipment that you have, and I could have easily done mine on my offset stick burner smoker. But I wanted to show you all how easy it can be on a Weber Kettle. I started out with about a half a chimney of lump charcoal, only allowing it to get about halfway burning before I dumped it in the Weber, banking it on one side. The idea here is to cook pretty cool, around 200 degrees is ideal. I placed a chunk of hickory on the coals, then put a water pan over the fire. You want to let the fire burn just a little so the the hickory is burning clean, not "yellow smoking" or smoking too heavy. Place an oven thermometer on the grate to check the temp. With the water pan over the coals, I was able to maintain 200 degrees throughout the cook. Coat the cooking grate opposite of the coals with olive oil and your ready for your trout. Smoke the trout until they are flaky and the flesh is opaque. They only take about an hour if you maintain around 200 degrees. Bring them in and let them cool, then use a fork to rake the meat off of the bones. Close down the vents on the Weber Kettle, and toss the tortillas on the grate to lightly toast them, if you like. They will only take about 1 minute on each side, so don't burn them. Bring them in and assemble your tacos however you like. For me, that's gonna be some smoked trout, shredded cheese, lettuce, sour cream, salsa, and garnish with a little fresh cilantro. Serve it up with a side of grilled corn, tomato and cucumber salad, which I will post the recipe for here on the website coming up.
-
Alright NY friends, I know you guys love your pies! So let me know if this southern boy is doing it right! Pizza is one of those foods that is kind of a staple of sorts. You can have it for tailgate and football parties, birthday parties, it's even great sitting around the pool relaxing in the summertime. We make our own pizzas on the Weber Kettle with lump charcoal and a chunk of oak for that wood fired flavor. I'm telling you, it could put the name brand pizza joints out of business! Here's what you need: Pizza dough, handmade or premade from the grocery store Pizza sauce, homemade or your favorite store bought 1 or 2 packs of Pizza cheese Sliced pepperoni 1 package of breakfast sausage Mushrooms 1 medium onion, (I prefer Vidalia, but I live in Georgia where you can get them. A sweet onion would do fine) Lump or briquette charcoal 1 small wood chunk such as oak, hickory or pecan 3 bricks (optional) Pizza stone Pizza peel The first thing to consider here is your dough. My wife makes a great homemade pizza dough, and I'll have to get her to spill the beans and post her recipe on here. She makes the dough and freezes it so we will have it when we need it. But we have found that for a couple of more dollars than making your own, the local grocery stores around here offer frozen doughs that are excellent. So check your local grocer and see if they offer anything, in the meantime, I'll try to get her to tell me her recipe! Now on to the rest of the pizza cook. Start off by browning the sausage in a pan. While it is going, go ahead and get the grill going. We use a Weber Kettle, but you could use whatever you have or what you like, you just may have to adjust my method to suit your needs. The key is you are going to heat your pizza stone to 500 degrees, so build your fire with that in mind. For my Weber Kettle, that will require one full chimney of charcoal, plus a few pieces dumped unlit into the grill. I usually use lump charcoal, but briquettes would work just fine. Once the charcoal gets going good, dump it in the middle of the grill and let it continue to burn until it is fully lit and all pieces are burning. Then spread it around the edges of the grill body, so as to create a "bowl" of heat with no charcoal in the middle. Next, place your chunk of wood or wood chips on the fire so they can start burning down. I like to use oak, but hickory or pecan will do nicely as well. You don't want to use much, just one chunk to give it a hint of wood flavor. The combination of the coals and the wood chunk will do this without overpowering the flavor of the pizza, but you want to let the wood burn down so that it doesn't smoke too heavy. Place your 3 bricks on the cooking grate in a position so that your pizza stone will sit on top of them. This step is optional, but through trial and error we have found that this method creates a "barrier" between the stone and the direct heat of the coals, and will lead to less burned crusts! Place the pizza stone on the bricks and put an oven thermometer on the stone to monitor the temp. Remember we want to get to 500 degrees ideally. Place the lid of your grill so that it is resting on the handle, but leaving a gap to allow oxygen and let the charcoal and wood continue to burn, creating a rising heat for your stone. Back inside, when your sausage has browned, remove it from the heat and strain it to remove the grease. Slice the mushrooms into 1/4 inch thick slices and slice the onions into slivers, and place in the leftover grease in the sausage pan. Lightly saute the mushrooms and onions, but don't let them get completely done. Now you are ready to put your pizza together while you are waiting for the stone to come up to temp. Cover your pizza peel with corn meal, as this will give a "marble effect", allowing the pizza to slide off easily onto the stone. Next, Shape the dough into the proper shape, being careful not to overwork it. Use your hands to stretch it and shape it, being careful not to get it too thin. This process takes practice, but you will learn how to get it to your liking, as folks like different thickness of pizza crust. Also be mindful of the size of your stone, don't make your crust bigger than the diameter of the stone! In fact it is best if you make it just slightly smaller, to prevent exposed crust from burning. Spoon out about 2 tablespoons of pizza sauce and use the bottom of the spoon to spread it around the dough. Then pile on the cheese, followed by the sausage, pepperoni, onions and mushrooms, then what the heck, maybe a little more cheese! We're ready for the grill! Once the stone has reached 500 degrees, remove the thermometer and carefully slide the pizza off of the peel onto the stone. You want to get the pizza on the stone so that no edge is hanging off the stone to prevent burning. Close the lid and let it go for about 7-8 minutes, then check it and use the peel to rotate it 180 degrees, to prevent hotspots on the bottom of the crust. It is impossible to get the charcoal exactly uniform around the bottom edge of the grill, so you may have one particular area or side that is hotter than the other. Close the lid back up and let it cook for another 7-8 minutes, or until the crust has puffed up and started to brown around the edges, the cheese has melted, and the mushrooms and onions look to have softened up. Using the peel, carefully slide the pizza off of the stone, take it in, slice and enjoy! You can use this method to create any type of pizza you like, the possibilities are endless!
-
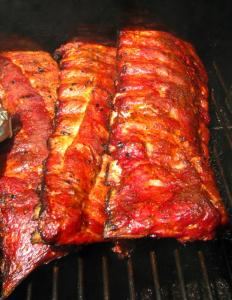
Spare ribs are generally cheaper than loin back ribs, but for quality they sure don't give up anything to the baby backs. In fact, alot of restaurants and competition BBQ cooks prefer them for their meatiness and more uniform, large size. Here's how I do 'em! What you'll need: Fresh pork spare ribs, as many racks as you think you need Old WoodFire Grill KK's 10 BBQ Rub Honey BBQ Sauce Hickory, pecan, apple of cherry wood or chunks I have a variety of cookers around the house, but I did this particular cook on my Masterbuilt vertical water smoker. No matter what type smoker you are going to use, you want to maintain a fire so that your cooking temperature hovers around 250 degrees. I don't mind dipping down to 225 degrees, and I dont' mind shooting up to 275 degrees, but I would keep it no hotter nor cooler than these temps. So for the vertical smoker, start out with a full chimney of lump charcoal, only half lit when poured into the charcoal pan. Add a chunk of wood to the coals for the smoke. I prefer hickory or pecan, but apple or cherry would also be good choices. Add the water pan if needed to keep the temperature within your targeted range. While the fire is coming up to temp, prepare the spare ribs by trimming to St. Louis style, using my method outlined here http://www.oldwoodfiregrill.com/?page_id=779. Once you have the ribs trimmed, apply a liberal amount of Old WoodFire Grill KK's 10 BBQ Rub to both sides of the rack (or racks). When the smoker has come up to temp and has leveled off, put the racks on the smoker and close the lid. Let them cook at 250 degrees for about 3 1/2 hours, or until the ends of the bones start to show and they droop on both sides if picked up in the middle with a pair of tongs. When they have reached this point, hit them with a thick glaze of honey and let them simmer on the smoker for another 30 minutes. After 30 minutes with the honey glaze, you can glaze them with your favorite BBQ sauce if you like, or you can bring them in and serve them "dry". I like them both ways, so I took a few pics of both styles. The consistency and texture of these ribs is tender, but not fall of the bone, which is the way I personally like my ribs. You have to tug a little when you bite into them to get the meat off of the bone. If you want them fall off the bone tender, there is a method that I will outline in a later post.
-
I have created a DVD of my personal hunts to the incredible world of Whitetail Giants! I have been very fortunate to travel with my family and friends to Saskatchewan, Canada seven times in search of monster whitetail deer. During the course of our travels, we hunted with 3 different outfitters and hunted both the northeast and the northwest side of the Province. This 1 hour 24 minute video chronicles those trips, bringing the bone-chilling cold and dark chocolate colored racks of Saskatchewan right to your living room. You'll see the camps, the stands, the guides, and most important, the bucks! Here is a sneak preview of some of the action: I am excited to offer this awesome collection of Canadian whitetail footage to you for only $12.95, plus $3.95 shipping. So order yours today and join us as we travel to outfitters such as Circle Lakes Outfitting, Buck Paradise and Turtle River Whitetail Outfitters in search of the monster bucks of the Mecca of the Whitetail World! Please PM me for details on how to order, or visit my website at http://www.oldwoodfiregrill.com/?page_id=705.
-
Smoking a whole pig is an experience every serious pitmaster has to try, at least once! Here is a small 50 pounder that we did that turned out smoking good! What you’ll need: A whole pig, dressed Olive oil KK’s 10 BBQ Rub, or rub of your choice Aluminum foil Block of wood to place in pig’s mouth Oak, Hickory, Pecan, Apple wood logs or chunks Charcoal (optional, depending on your cooker) Here we go: Get your pig from your meat purveyor (we got ours from a local independent meat market). The size of the pig depends on the size of your cooker, obviously the bigger the pig, the bigger the cooker you will need. We chose a 50 pounder for this cook, as it was about all that my cooker could handle. The day before you plan to cook the pig, lay it out on a flat surface, belly side up, and open up the cavity a little more than it already is. You can do this by taking a sharp knife and cutting down along the edges of the spine, starting near the head, and also in the loin area between the back legs. Next, apply a liberal amount of KK’s10 BBQ Rub or BBQ rub of your choice on the inside cavity, making sure to cover it well. Place the pig in a cooler or other cold holding place over night. The next day, build your fire in your cooker, using whatever fuel source is appropriate for your cooker. We used my offset smoker and burned hickory and red oak. You want to achieve a cooking temp of around 250 degrees. A little lower or a little higher is okay, just try to hover around the 250 degree mark. Take your pig out of the cooler while your fire is getting cranked up, and let it warm up to room temp if possible. You may not be able to get it up to room temp before the fire is going good, and that’s okay, just don’t wait and take it out of the cooler 5 minutes before you’re ready to cook. Next, coat the skin of the pig lightly with olive oil to give it a nice brown color when it is finished cooking. Wrap the ears with aluminum foil to keep them from burning, and place a block of wood in the pig’s mouth to keep it open during the cooking process, so you can put the apple in its mouth at the end! You are now ready to go on the pit. To flip or not to flip, that is the ever burning question when cooking a pig. We decided it would be best to flip, so we started with the belly side down and let it cook for about four hours, then we flipped it over and let it go for about three hours. For my own future reference, if you plan to flip, I would suggest cooking belly side up first, then flipping it over to finish so that the finished pig is sitting with its head up, for presentation purposes. We used an electronic remote meat thermometer with the probe placed in the front shoulder. This a thick, meaty place to check the temperature for doneness. You want to cook the pig to 200 degrees, ideally. You could most likely get away with cooking it to 185 degrees to 200 degrees, but in my opinion 200 degrees will yield the best result. It will take several hours for the pig to thoroughly cook, so plan ahead. In our case it took about 9 hours to get it up to 200 degrees. We then used welding gloves to pick up the entire cooking grate with the pick still on it, took it inside and pulled it. The meat just fell off the bones! This was a great experience, and I would recommend it to any serious BBQ’er!
-
Thanks and I am glad to be here! @burmjohn, no sir I have never hunted NY, but hope to get up there some day. In my opinion some of the finest Americans hail from New York!