CDN
-
Posts
31 -
Joined
-
Last visited
Content Type
Profiles
Forums
Hunting New York - NY Hunting, Deer, Bow Hunting, Fishing, Trapping, Predator News and Forums
Media Demo
Links
Calendar
Store
Everything posted by CDN
-
Thanks! I would love to cook for you guys!
-
These Smoked Bacon and Egg sandwiches are sure to get you wide awake. These things take a little more time than just throwing some eggs and bacon in a pan on the stove, but they are alot more fun and sure to impress your guests if you have a crowd coming over for breakfast. The smoky flavor is perfect with the bacon and eggs, and the toasted bread takes on a hint of smoke as well to really top it off. Here's what you need: Fresh eggs, one per sandwich Bacon, thick cut slices or Canadian bacon, or both English muffins or bagels, or both Cooking spray Muffin pan Black pepper or seasoning of your choice Wood chunks such as hickory, pecan or apple Start off by building a medium size fire in your cooker. For this cook, I used a Weber Kettle and lump charcoal, so for me that meant a chimney full of lump that was about halfway burning when I dumped it. Throw on a chunk of hickory, pecan or apple to get a little smoke flavor going. Use an oven thermometer to monitor the temp and bring it up to around 250. Then place the bacon slices on the grill opposite the fire and close the lid to let them get a little smoky flavor going. Situate the lid so that the vent is opposite the fire and directly over the bacon so as to draw the smoke over the bacon. Let the bacon smoke for about 20 minutes or until the edges start to get a little brown and crispy. Take it off the grill and open up the vents so the fire can burn a little hotter and get the heat up to around 350-400 while you are doing the prep work inside. Spray the bottom and edges of the muffin pan lightly with cooking oil and place the bacon slices and/or the Canadian bacon in the pan with one strip of bacon encircling the bottom of the pan, and another small piece laid across the bottom, as shown in the picture. Next, break open one egg for each slot and pour it in, trying not to break the yolk (unless you like it broken, of course). Now you are ready for the grill. You need to have your heat up to around 350 degrees by now. Place the muffin pan with the eggs and bacon on the cooking grate opoosite from the fire. Close the lid and let them cook for about 15 minutes. Put a little black pepper or you favorite seasoning on there about 5 minutes into it. Keep a close eye on them, and when the egss have whitened up, the yolks look set and the bacon has finished crisping up you're ready to bring them in. Lightly brush some olive oil on a few bagels and English muffins and lightly toast them on the grill. Keep a close watch on them so as not to burn the bread. Bring in the bread and the smoky bacon and eggs and put 'em together! I used hickory and put some monterey jack cheese on my sandwich to help enhance the light, smoky flavor of the hickory, along with a splash of Tabasco. I'm here to tell you it was absolutely out of this world good! !
-
Man, who can honestly say they haven't been to Waffle House at midnight and had a Grilled Patty Melt and a plate of hashbrowns? Well, if you haven't, you need to expand your horizons! Here is a little version that you can do at home with some venison that is just as good if not better. What you'll need: Venison cube steak, 1 large steak will make two sandwiches (can substitute beef) 1 medium sweet onion Texas Toast style bread Sliced Cheese Olive Oil 1 Tbs butter or margarine BBQ seasoning Sliced Pickles Wood chunks for flavoring (optional) Start out by cutting the cube steaks into sandwich size pieces, if they are not already. Brush them lightly with olive oil and sprinkle with BBQ seasoning. Slice up about half of an onion into long slivers and place in a grill safe pan, along with the butter and sprinkle BBQ seasoning all over the onions. Get the grill going to medium heat, say around 350 degrees. I cooked these on a Weber Kettle using one chimney full of lump charcoal, banked off to one side and with a piece of mesquite thrown on for a little flavor. Go ahead and put the onions on the grill just a couple of minutes before the steaks. Once the butter melts and the onions start to soften up, lightly coat the cooking grate with olive oil and put the steaks on, directly over the coals. Let them sear cook for 2 minutes, then flip and cook for 2 more minutes. As your steaks are finishing up, brush a light coat of olive oil on one side of your Texas toast pieces and toss them on the cooking grate, flipping them after about 30 seconds to avoid burning. It is best to use tongs for this, and keep a close watch on them so as not to get them too dark or black. Once the bread toasts, remove it from the grill and take the steaks, onions and cheese and assemble the sandwiches, then put them back on the grill with the lid closed for about 30 seconds to melt the cheese and get all the insides blended and toasted together. And that's it, you're ready for a meal fit for a Waffle House connoisseur! Garnish with a pickle slice and serve with a plate of fried hasbrowns to top it off (scattered, smothered and covered is optional).
-
This recipe comes to us from my mother-in-law Alice from Portland, Oregon. She graciously passed this recipe along to my lovely wife, then I got a hold of it and substituted venison for the beef, and I put it on the grill to give it a nice smoky flavor. In my opinion, the result was the best meatloaf I've ever eaten, but I suppose the next time ma'-in-law is in town I should cook it up for her, as she would be the ultimate judge! Here's what you'll need: 2 lbs ground venison 1 lb ground breakfast style sausage 1 1/2 cups Italian seasoned bread crumbs 1 3/4 cup milk 2 eggs, beaten 1/2 cup onion, minced 1 tsp salt 1/2 tsp black pepper 1/2 tsp dry mustard 1/2 tsp garlic powder 2 tbs worcestershire sauce Oak chunks (or hickory, pecan, apple or cherry) Start by building a medium to hot fire in the grill, around 400 degrees. I did this cook on the Weber Kettle, so for me that was a full chimney of lump charcoal, plus about a half chimney unlit. Once the charcoal in the chimney is burning good, pour it onto the pile of unlit in the grill, and allow all of the charcoal to get going. Once it is all burning, use a fire poker or fireplace shovel to spread the charcoal around the edges of the grill in a circle, leaving an empty space in the middle. This will allow you to place the meatloaf right in the middle of the grate over the open space and have direct heat around the pan, without burning the bottom. Toss a couple of chunks of wood on the coals to get a little smoky flavor going. I prefer the bold flavor of white oak or red oak for this recipe, but hickory, pecan, apple or cherry would also be good choices. While the fire is getting going, combine all the ingredients in a large bowl and mix together until well blended. Place the mixture in a grill safe pan and form into a "loaf". When the grill has reached a temp of 400-425 degrees, put the meatloaf on the grate in the center as described above. You can use a digital thermometer or an oven thermometer to monitor the temp of the cooking grate. Close the lid and let it cook to an internal temp of around 165 degrees, about 1 1/2 hours cooking time if you can maintain 350 to 400 degrees on your grill or smoker. Bring it in and drain the excess juice from the pan, slice and serve hot!
-
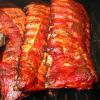
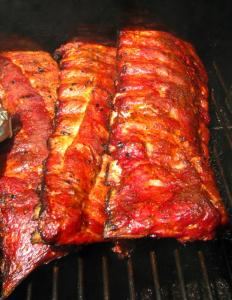
In a world where expensive ceramic cookers seem to be the "thing" to have, the good ol' Weber Kettle sometimes get lost in the maylay. But I'm here to tell you, don't be fooled friends - the Weber Kettle is more versatile than you think. Not taking away from the ceramic cookers, they are wonderful pieces of equipment that perform their respective jobs flawlessly. But for what they cost, you should expect nothing less. With a few tricks of the trade and a little practice, you can turn out absolute BBQ masterpieces on the Weber Kettle. Here's a how to on Baby Back Ribs that will make your Big Green Egg neighbor Green with envy! Here's what you'll need: Loin back ribs, 2 racks (if you need to cook more, use a ribrack) Oldwoodfire Grill KK's 10 BBQ Rub (available soon!) or your favorite BBQ rub Lump charcoal, or briquettes Pecan, hickory, apple, or cherry chunks Aluminum pie pans Start out by firing up the Weber with a chimney full of lump charcoal. Don't let it get completely burning though, infact as soon as it starts to burn a little, dump it in, banking it far to one side.If you have the Weber charcoal trays, even better. Add a chunk of your favorite wood, such as pecan, and let it start to burn a little. The wood can be presoaked in water or dry, whatever you like or have had good luck with previously. I always throw mine in dry, but if your a newbie or experimenting, I would suggest soaking the wood for a few hours prior to cooking. Place an aluminum pie pan next to the fire on the charcoal grate and fill with water. The position of the pan will be the cool side, directly under where the ribs will be placed on the cooking grate. Place the cooking grate into position and place another pie pan over the coals and wood and fill it with water also. Place an oven thermometer or other type grill thermometer in the center of the grate. Close the lid and let the grill warm up a bit. Ideally, you want to get up to 250 degrees, but 275-300 is okay. I would not let it get above 300 degrees. If you see this start to happen, adjust the bottom vent to choke off some of the airflow, or spritz the fire lightly with water from a spray bottle. Back inside, remove the membrane from the back side of the ribs. You can do this by slipping a spoon under the membrane to seperate it from the meat, then grabbing it with a paper towel and peeling off. Coat both sides of the ribs with a liberal amount of Oldwoodfire Grill KK"S 10 BBQ Rub (available soon!) or your favorite rub, and cut the rack in half to easier fit on the grill. Once your fire has evened out and you have light smoke from the grill, place the racks of ribs on the cooking grate on the cool side. If you are doing two racks and don't have a rib rack, you can stand them up "tent" style such as this. (Note: if one of the racks in this picture looks like a really thin rack of spares, it is. We had a really pathetically thin rack of spares in the freezer that really needed cooked, so I threw them on there. For normal size spares, I would cook them the same way, only increase the cooking time by 1 to 2 hours, depending on various factors. But we will get into that in a later post.) Close up the lid and let them go for about 2.5 hours, monitoring their progress about once every 30 minutes. Position the lid so that the vent is directly over the ribs, to draw the smoke over them. Judge the level of doneness by the color of the ribs, the amount of bone that is starting to show, and how flimsy they feel when you pick them up in the middle with a pair of tongs. If you can maintain 250-300 degrees, they will take 3-3.5 hours. Here's how we were looking after 1.5 hours. Notice the bark is starting to form and just a hint of bone is starting to show on the edges. At the 2.5 hour mark, I like to hit them with a glaze of honey. It enhances the sweetness and pairs well with my BBQ sauce. Liberally coat both sides with honey using a BBQ brush. Let the honey simmer on the ribs for a few minutes, then glaze them with your favorite BBQ sauce. Let them sit on the smoker for about 20 -30 minutes on the Weber with the BBQ sauce to seal in the flavor. Or if you prefer dry ribs, skip the BBQ sauce and the honey, and bring them in at around the 3 hour mark. Keep in mind that the longer the cook lasts, the more the charcoal will have burned and the less heat that you will have, so cooking times vary a little. You just have to get a good feel for when they are done. Notice the nice smoke ring on these individual ribs.
-
Hey guys, Newbie here from Georgia and excited to be here on this great forum. I have met some great guys from New York on my trips to Canada on hunting trips and I am really looking forward to hanging out with you guys. I love to hunt and fish, and especially cook! BBQ is my specialty, so you'll find me in the recipe forum quite a bit. Looking forward to it! CDN